How to Track Google Ads WhatsApp & Call Conversions with GTM
Why is Tracking WhatsApp and Call Clicks Crucial?
Google Ads conversion tracking isn't just for form submissions or product sales. When a user comes to your site from an ad and calls you or sends a WhatsApp message, they are one of your most valuable leads. If you don't measure these interactions, you face several problems:
Inaccurate Data, Poor Decisions: You won't know which campaign, ad group, or keyword is actually bringing you customers.
Wasted Budget: You will continue spending money on keywords that only generate clicks but no real engagement.
Missed Optimization Opportunities: Without real conversion data, you can't effectively use Google's smart bidding strategies (e.g., Maximize Conversions).
Before You Start: Required Tools
To set up this GTM-based conversion tracking, ensure you have access to the following two tools:
Your Google Ads Account
A Google Tag Manager (GTM) Account already set up on your website.
If you haven't yet added your Google Tag to your website, you must add the Google tag code snippets to your website's <head> and <body> as described before proceeding.
Step 1: Create a Conversion Action in Google Ads
First, we need to tell Google Ads what kind of conversion we want to track.
Log in to your Google Ads Account.
Navigate to Goals > Conversions > Summary
Click the + New conversion action button and select Website.
Choose the metric that best suits your tracking needs. For our call and WhatsApp tracking example, you can select "Contact."
Enter your website's address and scan it. Then scroll to the bottom of the page and click + Add a conversion action manually.
Fill out the form as follows:
--> Goal and action optimization: Choose a suitable category like Lead or Contact.
--> Conversion name: Give it a descriptive name you'll remember, e.g., WhatsApp and Call Button Clicks.
Count: Select One. This ensures that even if a single user clicks the button multiple times, it will only be counted as one conversion, which is the most accurate method for lead tracking.
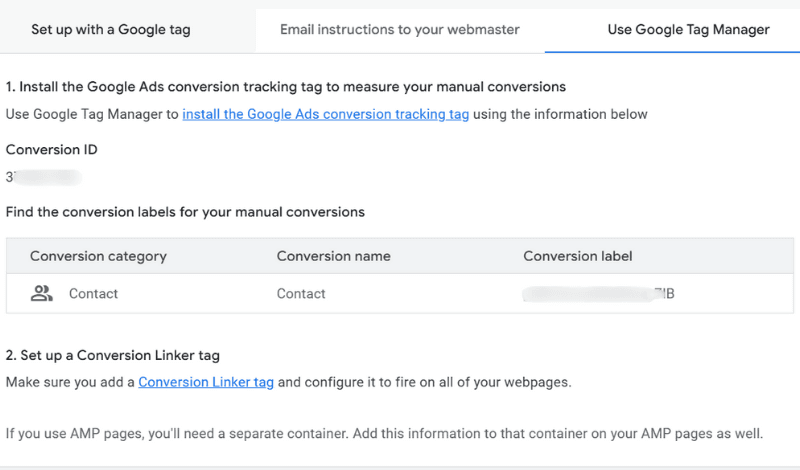
Click Save and Continue, then switch to the Use Google Tag Manager tab
Copy the Conversion ID and Conversion Label provided. You will need these in the next step.
Step 2: Set Up Google Tag Manager (GTM)
Now, we will instruct GTM to send a conversion signal to Google Ads when the specified buttons are clicked.
A. Enable Necessary Built-In Variables
To allow GTM to read click details (e.g., the URL clicked), we need to enable this "memory" feature.
In your Google Tag Manager panel, click on Variables in the left-hand menu.
Click the Configure button next to the Built-In Variables box.
Check all the boxes under the Clicks heading (Click Element, Click Classes, Click URL, etc.)
B. Find Your Click Event Name (Critical First Step)
A Trigger defines the conditions under which our tag will fire.
First, Discover Your Site's Link Structure
Every website has a different code structure. Therefore, before creating the rule, you must find out how the links on your buttons are written.
Open your website and hover over the WhatsApp or phone icon you want to track.
Right-click and select Inspect
In the opened code panel, find the section starting with href="...". This is the critical Click URL value for us.
For a phone number: You should see =tel:+901234567890
For WhatsApp: https://wa.me/901234567890 or a similar structure.
Now we know we need to listen for clicks containing tel: and wa.me keywords in GTM.
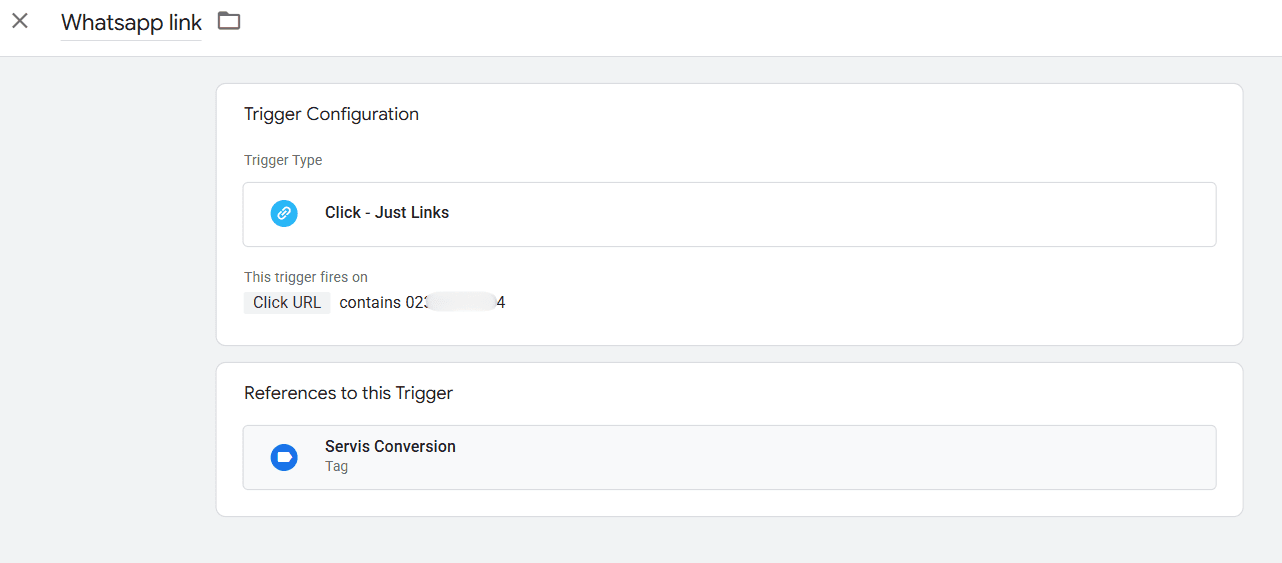
Now, Let's Create the Trigger

In GTM, navigate to Triggers > New.
Name the trigger Trigger - Call and WhatsApp Clicks.
For the trigger type, select Just Links.
Check the Some Link Clicks option.
Configure the first rule as: Click URL - contains - tel: (or tel:+901234567890 for a specific number).
Click the + button to add a second rule: Click URL - contains - wa.me (or https://wa.me/901234567890 for a specific link).
Ensure that the OR condition is selected above these two rules. This will make the trigger fire if the clicked URL contains tel: OR wa.me.
Click Save.
C. Create the Google Ads Tag
The Tag is the action that will be performed when the trigger fires.
In GTM, navigate to Tags > New.
Name the tag "Google Ads - Conversion - Call and WhatsApp.
For the tag type, select Google Ads Conversion Tracking.
Paste the Conversion ID and Conversion Label you copied from Google Ads in Step 1 into the respective fields.
Click on the Triggering section at the bottom and select the "Trigger - Call and WhatsApp Clicks" you created in the previous step.
Click Save.
For Custom Triggers: Find Your Click Event Name
If you are creating a custom trigger, you first need to know exactly what event name GTM "listens" for when your button is clicked.
Launch Preview mode from the top right corner of the GTM panel.
On your website, click your WhatsApp or Call button.
Return to the Tag Assistant window. In the event summary list on the left, you'll likely see an event named Link Click.
Click on this Link Click event.
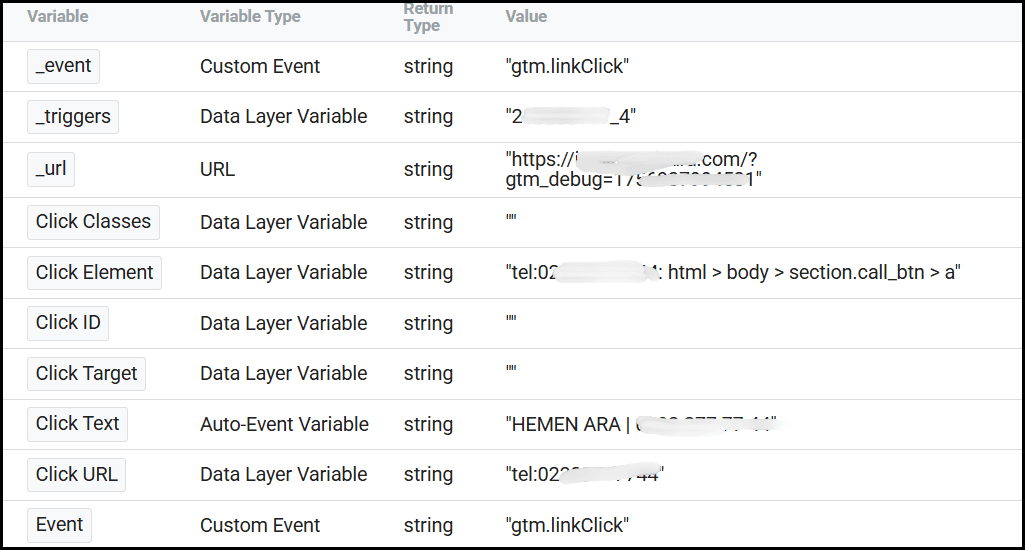
Now, select the Variables tab in the main section of Tag Assistant.
Find the variable named _event. Its value will be something like "gtm.linkClick". This is the exact event name required for our trigger.
After this step, you can create a Custom Trigger and, in the "Event Name" field, enter the _event value (e.g., gtm.linkClick) and save it with a similar rule as in Step B.
D. Add Google Ads Conversion Linker
In GTM, navigate to Tags > New.
Choose Conversion Linker as the tag type.
Select "All Pages" as the trigger.
Click Save.
E. Add Page View Conversion
In GTM, navigate to Tags > New.
Choose Google Ads Conversion Tracking as the tag type.
Paste the Conversion ID and Conversion Label values you obtained from Google Ads in Step 1 into the respective fields.
Click on the Triggering section at the bottom and select "All Pages."
Click Save.
Step 3: Test and Publish
As a final step, we need to ensure everything is working correctly.
Launch Preview mode from the top right corner of the GTM panel.
Once your website loads, click both your phone and WhatsApp buttons.
Return to the Preview panel. In the event stream on the left, when you see the Link Click action, your "Google Ads - Conversion - Call and WhatsApp" tag should appear under the Tags Fired heading
If you see the tag has fired, the setup is successful!
Return to your GTM dashboard and click the Submit button to publish your changes.
For more information, you can review Google's official help documentation.
Remember, accurate conversion data is also the first step in the fight against ad fraud.
By measuring valuable interactions made only by real users, you can more clearly analyze the impact of invalid clicks on your budget.
For more PPC tips and optimization guides, continue following the ClickSambo Blog.
Bots can trigger phone/WhatsApp tags too. Ensure your leads are real humans before you call back.

Frequently asked questions
This is the "Measurement Gap." GTM tracks the click on the button, not the actual message sent inside the WhatsApp app. This is why filtering for Ad Fraud is vital—bots can click the button to trigger a conversion signal, but they can't send a human message. ClickSambo helps you identify which "clicks" were non-human.
Yes. Once the conversion action is created in Google Ads and the tag is live in GTM, P-Max will use this data to optimize its bidding. This is why "Clean Data" is essential; if bots click your WhatsApp button, P-Max will spend your budget trying to find more bots.
For WhatsApp and Calls, always choose "One." If a user clicks the button three times to make sure it works, you don't want to count three conversions. Counting "Every" is usually reserved for purchases where each transaction has unique value.
Yes. Instead of just tel:, you can set the Trigger rule to "Click URL - contains - tel:+90555..." for a specific branch. This allows you to see which location's ad is driving the most calls.